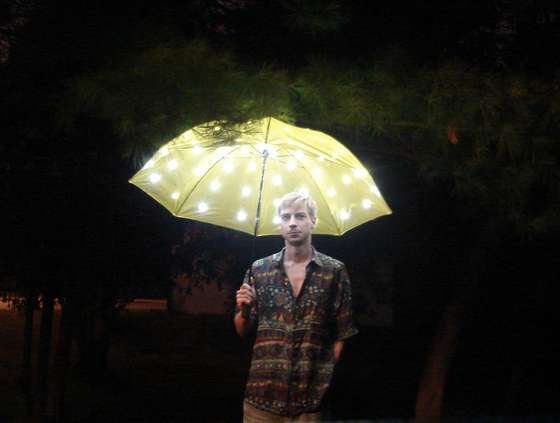
The creative source is a loose umbrella, and the idea looks grotesque and a bit whimsical.
This article refers to the address: http://
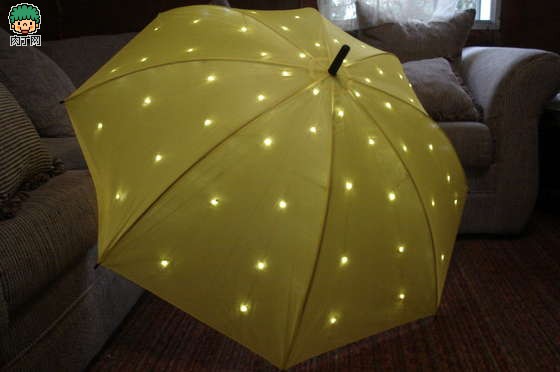
Simply put, just embellish the "star" on an ordinary umbrella.
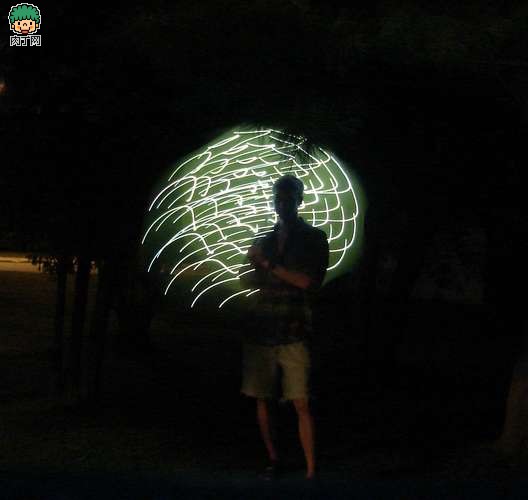
On a quiet evening on a country road, you can walk quietly, perhaps just stupidly opening the umbrella full of stars, feeling a mood, meaning a realm. When you are excited, you will brighten up the "Starlight". When you are depressed, you will dilute the "Starlight." Everything, depending on the mood! Anytime with the homemade light wave superstar, become the night elf!
Two-way elevator
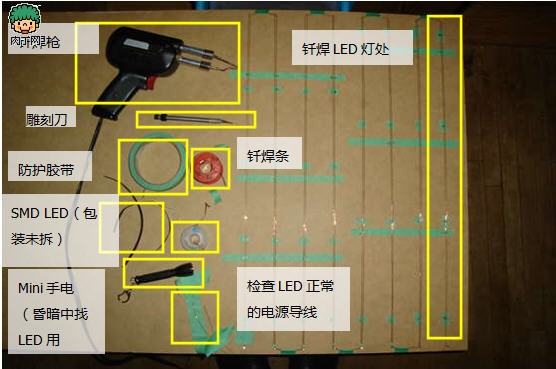
1 Tools and materials
2 welding LED
3 assembly
4 Install the center ring and wires
5 LED light bar fixing
6 assembly power switch, brightness adjustment switch
7 completed
8 DIYer check-in
1 Tools and materials
Components and tools are cumbersome and need to be purchased through local stores, electronic parts stores, the Internet, etc., as well as the need to collect some of the existing discarded electronic components on hand.
â—‹ Umbrella, light umbrella is appropriate (I take yellow as an example), the umbrella is in the form of a straight handle, the umbrella shaft is hollow, and the hollow part is used to penetrate the wire. Keep in mind that the simpler the umbrella, the more complicated the umbrella (such as an automatic umbrella with a spring) is likely to be unsuccessful in DIY. Once again, the umbrella shaft needs to be hollow!
â—‹ 64 patch LED lights, color with personal taste. The actual size of the LEDs does not matter, but the caveat is that smaller sizes are more concealed (recommended) and more difficult to install. I am using a 805 (2mm wide) 3.5v white LED light. White, blue, purple, and some green LEDs require 3.5V and do not require additional resistors, but 1.8V LEDs (red, yellow, green) require additional resistors, which can take some time and effort.
â—‹ Thin single spool for winding copper wire. It is best to be thick and thin, so fine that it can be hidden on the umbrella, but it should not be too thin. Since the LED light of the patch should be welded to the thin shaft, it is inevitable to press the bobbin from time to time during the welding process, which requires a certain strength. .
â—‹ Three 7-cell battery compartments, preferably a compact L-shaped battery compartment, because the battery needs to be mounted on the central axis of the umbrella. The three 5th battery compartments are also more ok, but the battery capacity is too small, and the lighting time is not strong.
â—‹ Ordinary plastic stranded copper wire on the line, buy a good quality, can withstand multiple bends and still not humble (not broken).
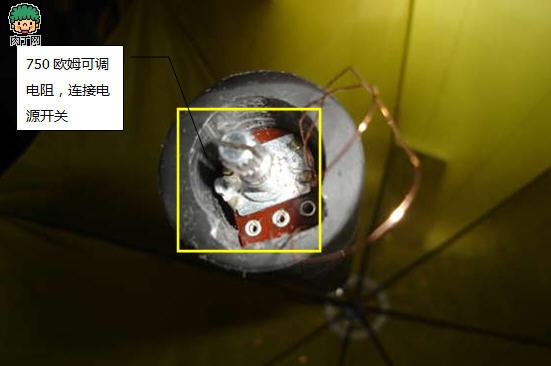
â—‹ A 750 ohm adjustable resistor with built-in on/off switch. The resistor adjusts the brightness of the LED and the switch controls the LED switch.
â—‹ There are a number of needles. (The color of the line is the same as the color of the umbrella, and the concealment effect is better~).

â— Electric drill and several drill bits
â— Solder wire and electric iron / electric gun
â— Wire cutters, wire strippers, scissors, carving knives
â— Large working plate and small nails (used for wiring to solder LED lights to copper wires)
â— Protective tape and double-sided tape
â— Transparent epoxy or hot melt adhesive, super glue
2 welding LED

â— First of all, please be prepared for the long time and careful and meticulous work. It is necessary to weld 64 LEDs similar to sand to a copper wire that does not fit well. Believe me, this is not a good job.
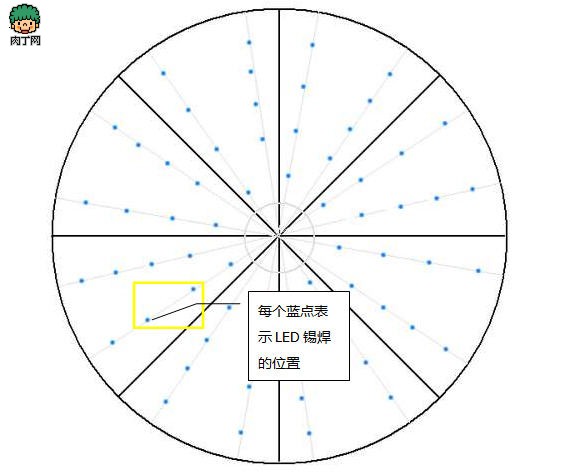
â— Measure your umbrella before soldering, and then plan which area to install the LED light. The umbrella should be divided into 16 radial zones, each zone welding 4 LED lights. I chose 4 groups (8 in each group) for different LED light spacing, which I want to pretend to be randomly arranged. Of course, the LED lamp spacing value is ultimately based on the fact that the spot distribution on the umbrella surface appears to be both compact and evenly spread over the entire umbrella surface.
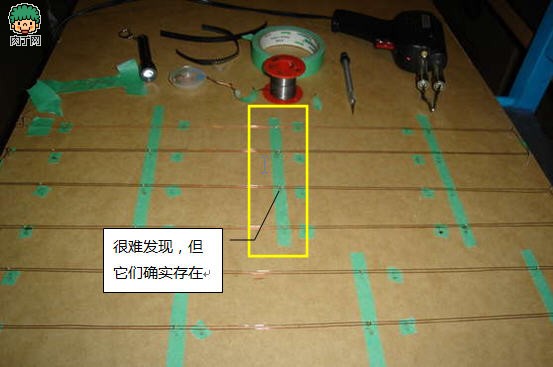
◠Look for a large area of ​​wood (at least larger than your umbrella), prepare a hammer and some nails. Nail the nails on the board and wrap the strands of copper around the nails (each nail should be two copper wires).
â— Place protective tape or clean the position of the solder joint at the soldering spot of the LED lamp. It is necessary to leave a certain amount of allowance for the end of the copper wire. If the copper wire is installed on the umbrella, the copper wire is not enough. Do you not mourn?
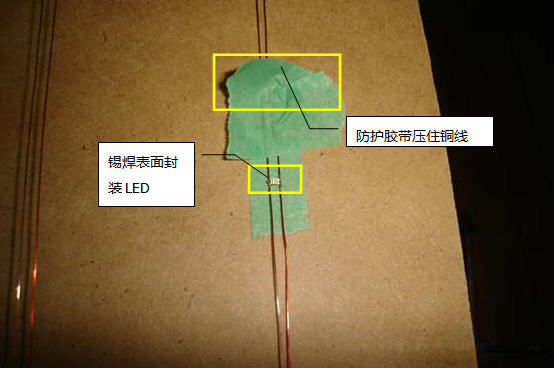
â— In the brazing operation, in order to avoid burning the board (of course, this is a disposable board), put a little protective tape under the copper wire, and also use protective tape to fix the copper wire.
â— The copper wire I used is insulated. I have to use a soldering gun and an electric soldering iron to burn off the insulation of the LED placement point (you can use a wire stripper or scrape the insulation). When the copper wire and flux have been glued together, the LED light is squeezed between the two wires. Friendly Tip: Note that the LED lights are polar and must be uniform when soldering.
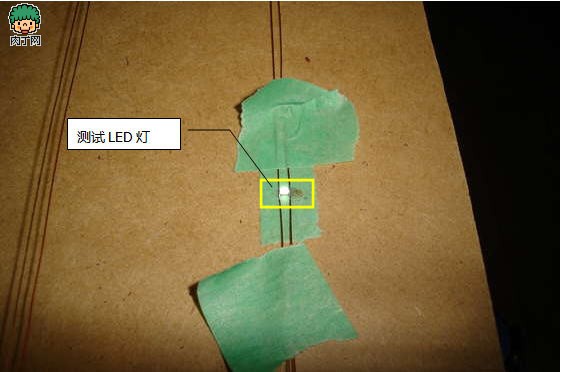
â— Start soldering LED lights. I still used protective tape to clamp the copper wires together to fix the LED position, otherwise they would not be disturbed and made me very depressed. Like a first kiss, a quick, light touch, the tip of the solder gun "kiss" LED poles, the solder on the wire and the solder tip of the solder gun into the LED connect the LED and the wire.
◠Check if the “first kiss†is successful. Hang it on the board with 3 AA batteries, turn on the power, and check if the LED lights up normally.
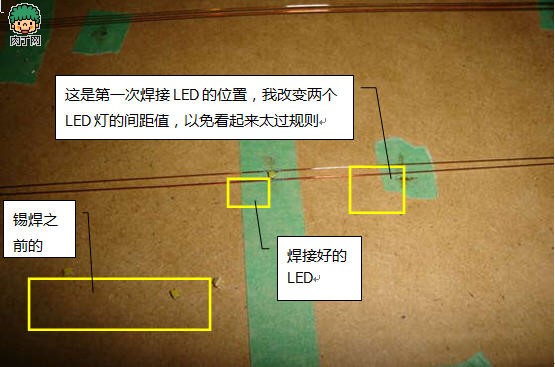
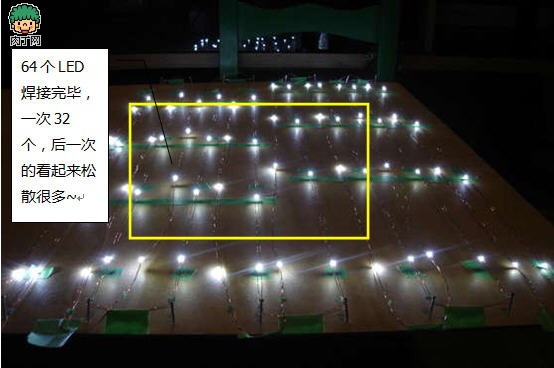
â— Once you have found the feeling, don't stop and continue to solder the remaining LED lights, feeling fleeting. I finished the welding twice, half of the welding (16 radiation zones), and adjusted it during the period.
â— Finally, the LED lights are all soldered (applause).
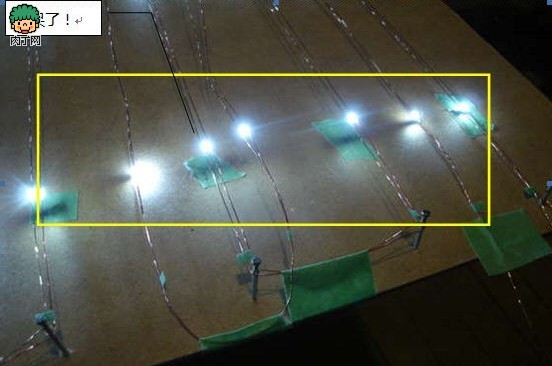
â— Test with the power supply and check that all the LEDs are easily and happily matched with the copper wire. At the same time, this time is also thinking about how much power to the umbrella, mainly battery power and adjustable resistance. I used a low-profile 3AA battery (4.5 volts (or 3.6 volts for a rechargeable battery) and a 750 ohm adjustable resistor.
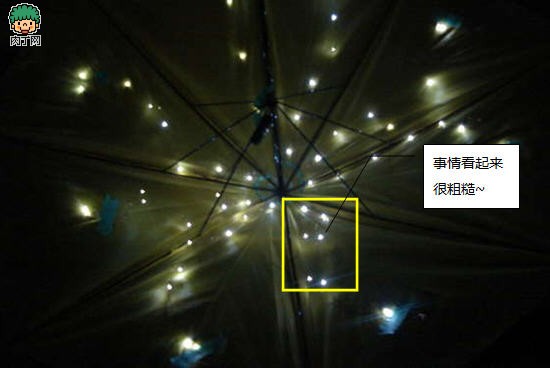
â— Look at the mid-term effect~
3 assembly

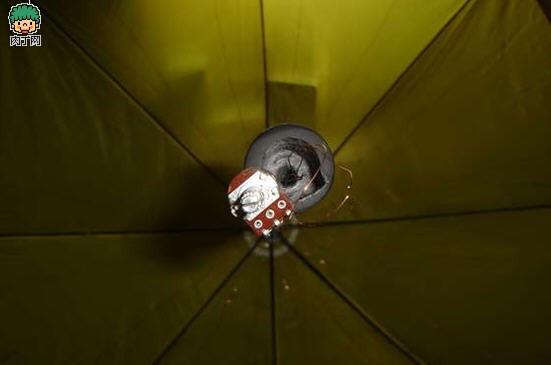
â— All the wires that are soldered on the LED light are scattered from a central circle near the tip of the umbrella. This difficult part is first placed on the outer layer of the umbrella, and then carefully pressed from the outside into the canvas surface and The part between the umbrella poles. I took a two-step approach. The advantage is that it works better in the narrow area between the umbrella surface and the umbrella pole. In addition, when brazing, I don't want to weld my umbrella surface like a hollow outfit.
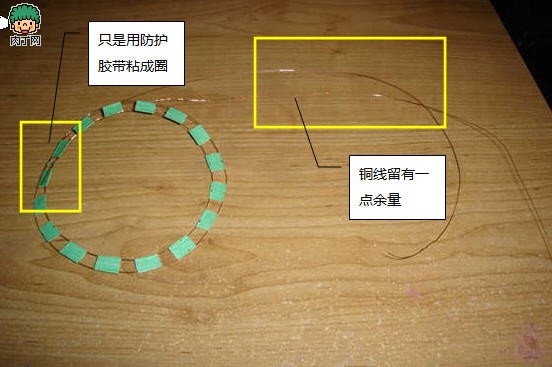
â— With two coils around the copper wire, I used protective tape again to maintain the shape of the circumference. Of course, the protective tape can also be positioned to align with the LED light chain above. If the center circle is too close to the tip of the umbrella (the size of the center ring will be smaller), then the size of the center coil needs to be carefully considered.
â— Don't take for granted a complete center circle at the beginning, you need to fit the center circle onto the umbrella instead of just making a circle. Still patiently tie the center ring with more protective tape, leaving enough head at one end of the coil. This allowance ensures that the end of the coil can be connected to the battery after assembly.
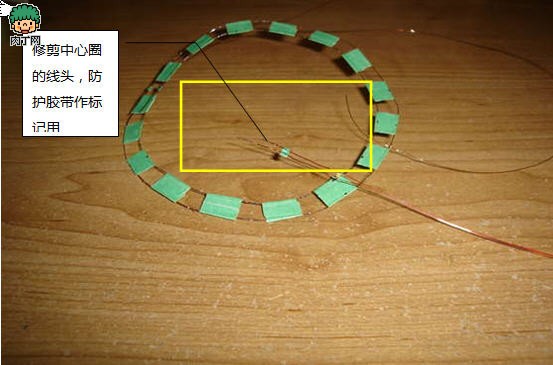
â— Trim the thread ends of the center ring and use protective tape for marking.
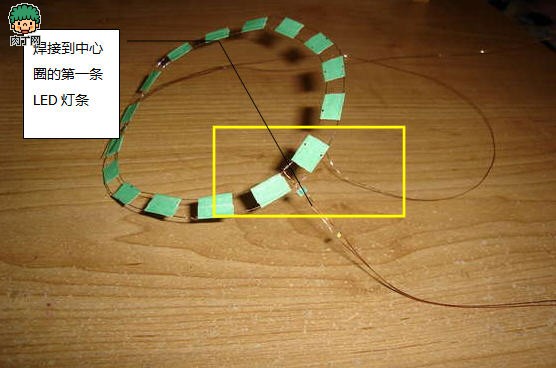
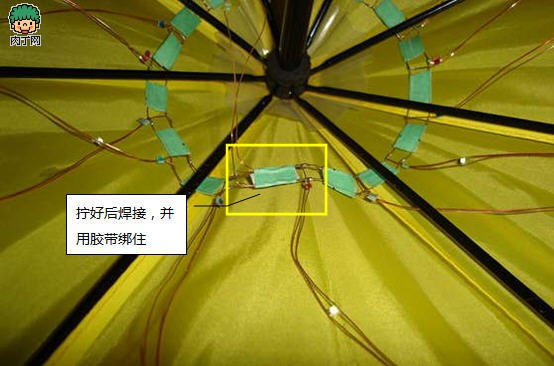
â— Start welding the lines of LED lights to the center circle.
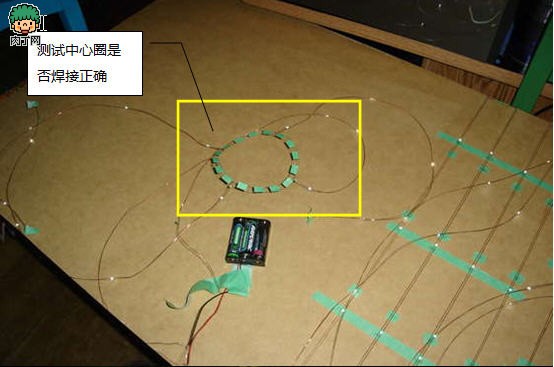
â— Test it after welding!
â— Does it seem that it can only be described as "heart-wrenching"?
â— I still use the same single-strand copper wire as when brazing LED lights. In fact, this is a big mistake. Think about it, the umbrella is constantly opening and closing, and the copper wire near the middle coil needs to be subjected to constant bending and tormenting. The unpowered copper wire will inevitably break under the bending of the force, and the LED light will be extinguished! Later, I welded an attachment coil on the center ring so that it can withstand the bending of the dead.
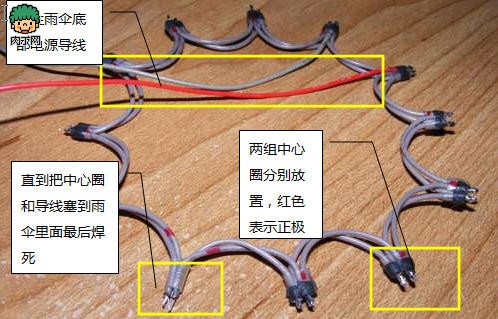
â— The center circle of my improved work uses "wires only", no reinforcement coils, you can understand the picture.
â— The next step is to cut the LED lights on the board into small strips (four LED lights on each). After calibrating the margin, length, and LED position of each strip, these strips are soldered to the center circle.
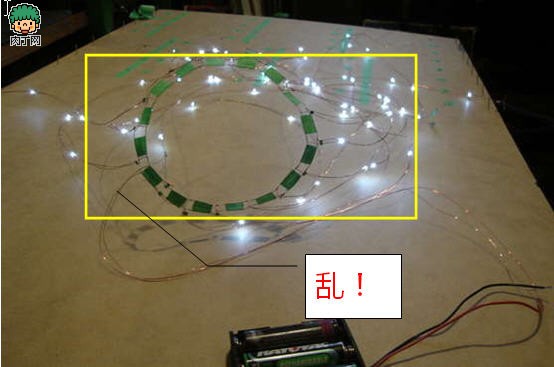
â— Have to remind you to pay attention to the wire/power polarity. The easy way is to use a power supply to detect it. After all the 16 strips are welded to the center circle, the messy lines piled up in front of your eyes. Maybe these line piles can be a compelling net or a small cap, but we still focus on doing one. Put a beautiful umbrella :)
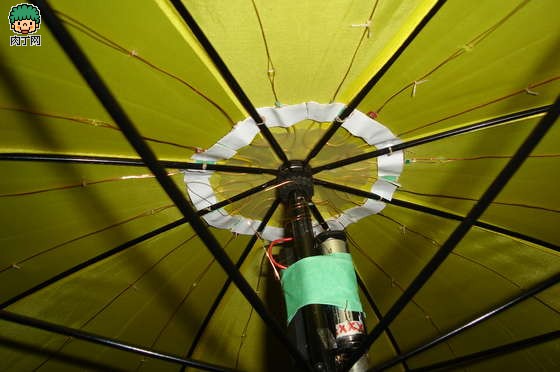
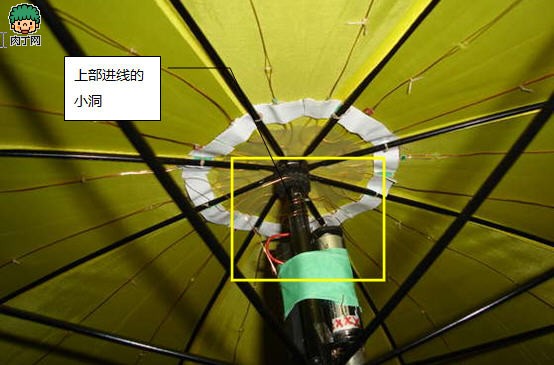
4 Install the center ring and wires

â— Place the center circle and the messy wires roughly in the center of the umbrella, carefully threading the center circle under the umbrella wire.
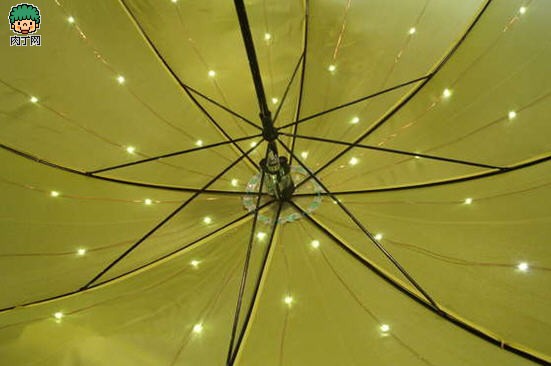
â— The situation after this step should be that the center circle is surrounded by the umbrella pole, and other stars are scattered between the umbrella canvas and the umbrella wire.
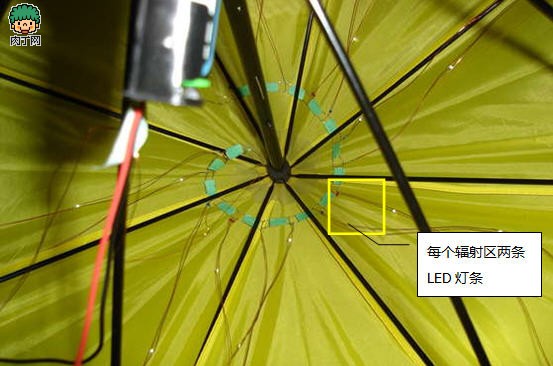
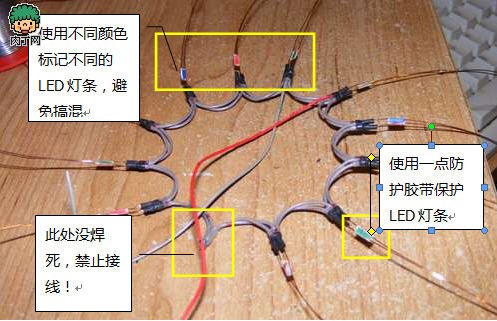
â— Slowly place the LED strip on the umbrella wire until there are two LED strips per 1/8 area.

â— When the above work is completed, the center circle is closed. First cut and then peel and twist, twist the end of the center ring into a strand.
â— Place some newspapers between the center ring and the umbrella canvas to avoid welding small holes in the umbrella canvas during the brazing process, so that the center ring can be welded securely.
â— When finished, tie the thread to the center ring with point guard tape so that its shape and spacing match the rest of the center circle.
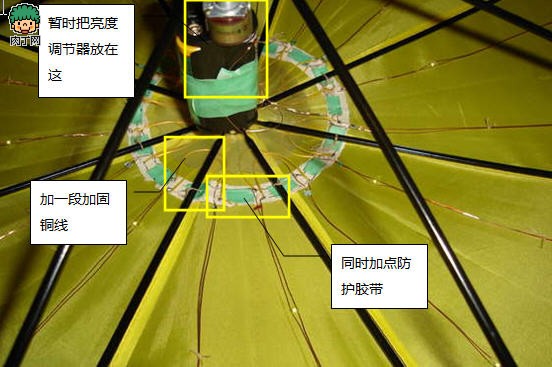
â— Ok, now there should be two wires from the center circle, which are connected to the battery pack, power switch, and brightness adjustment switch.
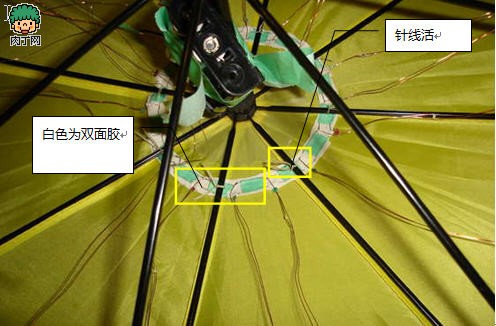
â— Cut a little double-sided tape and glue it under the center circle to avoid the center circle.
â— After placing the center ring, arrange two LED strips on both sides with the umbrella spoke wire as the center.
â— After all positioning, stitch the center circle to the umbrella wire and umbrella canvas with needlework.
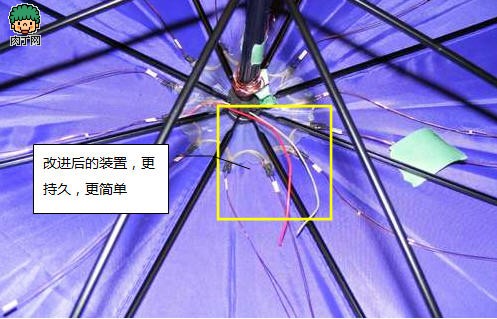
â— The upgrade version is more durable and simple~
5 LED light bar fixing
â— Things finally look exactly the same. What you need to do now is to fix the LED strip to the umbrella canvas.
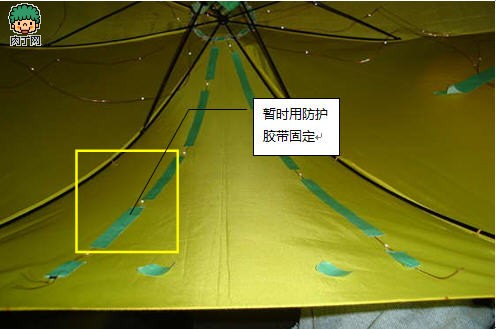
â— Carefully stretch the light bar outwards and pull the light bar to the edge of the umbrella. Use protective tape to attach the light bar to the canvas to allow it to be initially fixed.
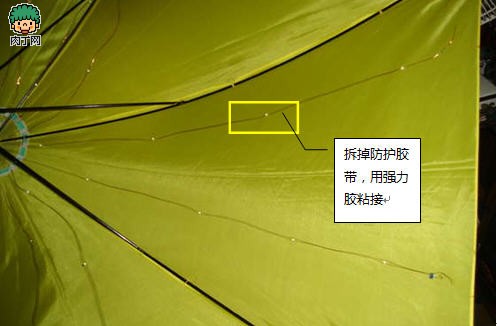
◠Use super glue to bond these LED strips to the umbrella canvas – make sure that these lines are not bent, and all the LED lights are attached to the umbrella surface. If the craft is not fine, find an assistant to hold the umbrella. .
â— After all the stuff is fixed, the protective tape can be removed at this time.
â— Cut off the excess thread.
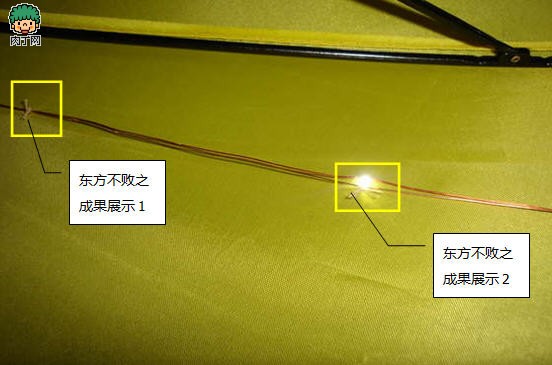
â— Try the power supply and see how the quality of the umbrella is done, but this does not mean the end. This is just a process of experience and inspection. Of course, all of this is the way, and the prototype is also coming out. This is also the first. Watching how your work works
!
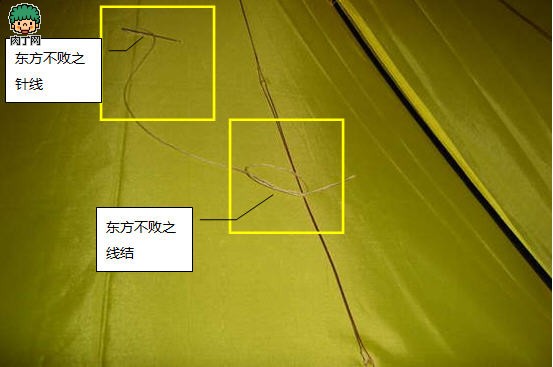
â— Long-lasting to show off this umbrella, the super glue will obviously not match. When the copper wire and the LED light bar are attached to the umbrella, the super glue only temporarily fixes each device. I used some small braided buckles - one for each LED light and one for each of the two LED lights.
6 assembly power switch, brightness adjustment switch
â— Before installing the switch and brightness adjustment controller, you need to drill a few holes to get the top wire out of the umbrella pole.
â— Drill a few small holes in the upper part of the umbrella pole. The hole diameter does not have to be too large, as long as it can accommodate the few thin copper wires.
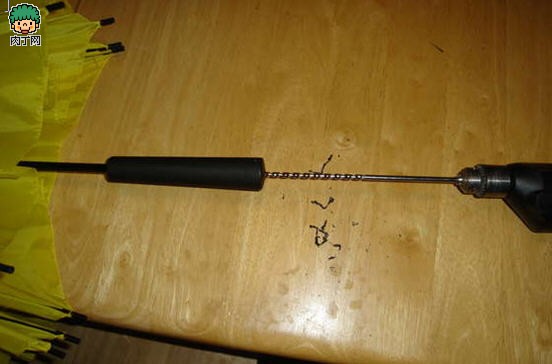
◠Do not wear the thread after the drill. Next, you need to drill the umbrella handle – carefully pass the umbrella handle to the metal part of the umbrella pole.
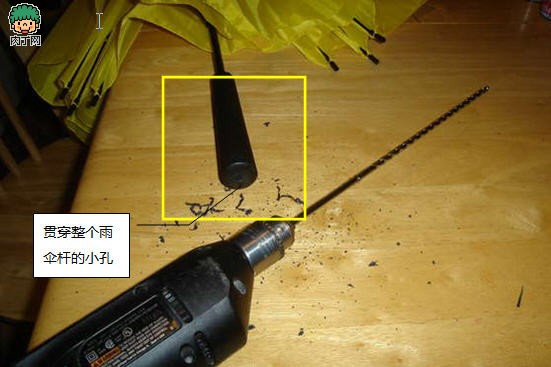
â— The size of the drill bit is only slightly smaller than the diameter of the umbrella rod. Carefully and slowly drill from the center, holding the electric drill (slightly tilting will destroy the aesthetics of the handle) until it is drilled.
â— In addition, the drilling hole should be large enough so that the drill cuttings inside can be discharged smoothly. Try to get all the drill cuttings out.

â— The next step is to drill a large hole in the handle, not too deep, as long as you can put the brightness adjustment switch. I used a 3/4 foot drill bit and inserted it from the bottom of the handle.
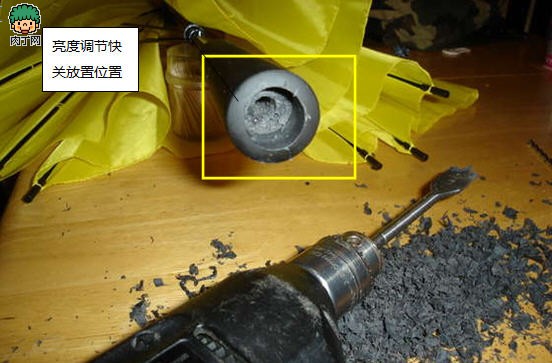
â— I drew a little deeper in order to leave a margin for the irregular brightness adjustment switch. Again, the cuttings in the umbrella are made out by various methods.
◠Ok, it’s time to connect the wires to the switch. Pass the copper wire from the small hole in the upper part of the umbrella pole and climb out from the slightly larger hole in the bottom. This is not an easy task, the copper wire is easy to start on the top of the mess, always refused to come down. If the copper wire is stuck in the umbrella pole, pull it out and try it again; if the bend is too strong, replace it with a new straight copper wire.
â— Well, after the two copper wires are collused, one is soldered to the upper battery case and the other is connected to the center ring/LED strip. The other one on the center ring is welded to the second one of the battery case. The copper wire in the lower part (bottom of the handle) is soldered to the power switch and brightness adjustment switch. Design the circuit so that the counterclockwise rotation of the adjustable resistor is that the light is dimmed and the power can be cut off, and the clockwise rotation can make the LED light gradually brighten. At this point, the circuit is more complicated, so look carefully at the soldering of the copper wire.
â— Open the switch test and fix the adjustable resistor with glue. Epoxy resin or other hot melt adhesive can be used. If possible, design a beautiful cover to cover the adjustable resistance.
7 completed
â— In the end, only the assembled battery box is left. I tied my battery case, but I can move it up and down within a limited range - this design is justified: first, when you turn off the umbrella, the battery case has to move down (the umbrella in the battery case after the umbrella is closed) The farther the top, the better, unless you want to add some protection to the already fragile copper wire). When the umbrella is turned on, the battery case will go up a little distance (this is pushed by the force received by the umbrella).
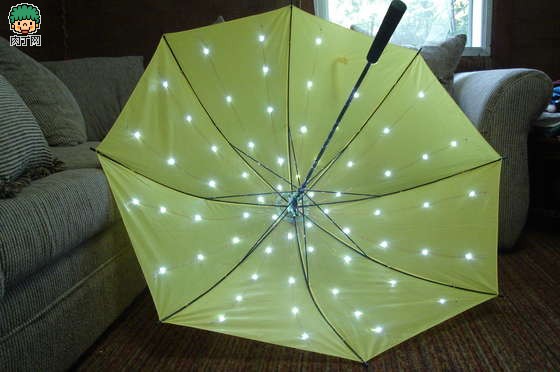
â— Finally, you can take an umbrella and go out to pick up a girl!

â— It looks very beautiful, but it is a bit too expensive. It is forbidden to carry out in the windy weather - I am not sure if the wind will turn off the umbrella and the copper wire will not break. In addition, slow-opening and slow-closing, in the process of self-indulgence, I am always wary not to be too stressed. Otherwise, the thin copper wire will make you lose all your efforts.
â— I am a wonderful flower blooming in the night in the rain...
Fit for both rental and fixed installation application which achieve the most multi-function application with one screen with the advantages of 1.Ultra-light: 3.5KG/Cabinet, 14KG/㎡ which is the world's most light weight Led Display Ultra-light will help you protect the screen better during the installation and transportation 2. Ultra slim and thin: 5.5cm thickness which is the world's thinnest LED display Ultra slim will help you reduce 50% transportation cost 3. 50% saving of the flight case packing. Flight case dimension is just 550x800x650mm after loading 12 pcs cabinet which save 50% packing volume comparing to the conventional cabinet. 4. Independent suspension mounting structure No need any installation tools when installation Patented, magnetically fast mountable architecture
Led Curtain Display,Digital Commercial Display Led Screen,Flexible Led Display Panels,Commercial Display Led Screen
Shenzhen Joy LED Display Co., Ltd. , https://www.joe-led.com